In the above video I walk through my process for moving my scenes out of Daz Studio and into Blender so I can render them with out with linework.
If you’re going to digitally ink your 3D scenes yourself, by far the best way to get high quality rendered linework is by using the Freestyle engine integrated into Blender.
This is perfect if you’re already using Blender for your 3D comics, but if you’re using Daz Studio there are a few steps to safely getting your scene from Daz into Blender.
To use Freestyle in a Daz to Blender workflow, we need to follow a basic set of steps:
- Install the Teleblender Daz to Blender script in Daz and Blender
- Prepare our Daz scene for export
- Export using Teleblender
- Import scene into Blender
- Do basic cleanup and organizing of scene in Blender
- Activate Freestyle and setup environment
- Setup lines with Freestyle
This will seem like a lot, but trust me you’ll be flying through all these steps once you get the hang of it.
If you’re just here for the links I’ll put them all right here:
- MCJ Teleblender Temp4** beta release
- Freestyle Manual
- Freestyle Edge Types
- Freestyle Stroke Chaining Instructions
- Freestyle Modifiers
- Blender NPR (Non-Photorealistic Rendering) Website
- Freestyle Level Up Course (not an affiliate link)
- BlenderArtists.org Freestyle Forum
1. TELEBLENDER INSTALL IN DAZ STUDIO
Go to Mcasual’s site to get the Teleblender Temp4 beta release as of this date:
MCJ Teleblender Temp4** beta release
Scroll all the way to the bottom and download both of the links. The ‘MCJTELEBLENDER4BETA’ script goes in Daz, while the ‘MCJBLENDBOT’ scripts go into Blender.
The Daz script I just threw in my Daz Studio scripts folder located in ‘My DAZ 3D Library > Scripts’.
Look and see what folders you have listed in your Daz Content Manager (find this in the flyout menu of your Content Library tab). These are the folders that Daz knows about so it can go anywhere in there.
You have to run ‘Scan known directories for files’ (also in the flyout menu of your Content Library tab), and then it will be available to use in your library.
If you don’t want to put it in the library, you can always run the script from any location by merging it into your scene via File > Merge…
So that takes care of the Daz install, let’s add the ‘BlendBot’ scripts to Blender while we’re installing…
TELEBLENDER INSTALL IN BLENDER
You’ll need to extract the files from the Blendbot zip, then place them in the correct directory for Blender to see them.
On Windows they go in:
C://Program Files > Blender Foundation > Blender 2.81 > 2.81 > scripts > modules
On the Mac they go in the addons folder for you Blender version found in your Library folder:
/Users/[YOUR USERNAME]/Library/Application Support/Blender/2.81]/scripts/addons
Sometimes getting to this folder on the Mac is difficult, as it can be hidden by default in some versions of the OS. If you can’t find it, try going to the Finder, then holding down the Option key and clicking the ‘Go’ menu in the top menu bar. Library should show for you then.
Place them in there, then the next time you load Blender they should be ready.
2. PREPARE DAZ SCENE FOR EXPORT
To prepare for exporting I’ll usually copy the scene and name it something like ‘For Freestyle’, so I know I probably changed some things in that file.
Quick and easy things to do are delete lights and delete extra cameras. The script has checkboxes to let you exclude unneeded lights and cameras, but the cameras seems to always show up. This script is a beta script so my guess is there’s a minor issue that needs ot be adjusted there. No problem though on our end.
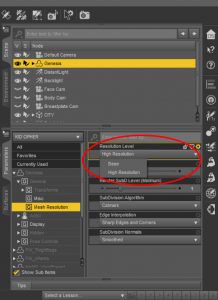
The next thing that needs to be done is to set every model to Base Resolution. Daz has a “smoothing” modifier that rounds out the sharp corners by faking additional geometry.
This is great in Daz, but if we leave that on at export time all that extra geometry will become real when it imports into Blender. That can cost us in render times and even in speed while working in the Blender viewport, so we want to avoid that. Don’t worry though we’ll re-apply an equivalent modifier in Blender to smooth things out when we get in there.
But in this scene the only thing using higher than Base Resolution is the Genesis figure. So to change that I’ll click on him, then in the Parameters there should be a ‘Mesh Resolution’ setting. I’ll change this from High Resolution’ to ‘Base Resolution’.
To show you the difference see the screenshot below of the Blender file I made with the Genesis figure exported on High and on Base level.
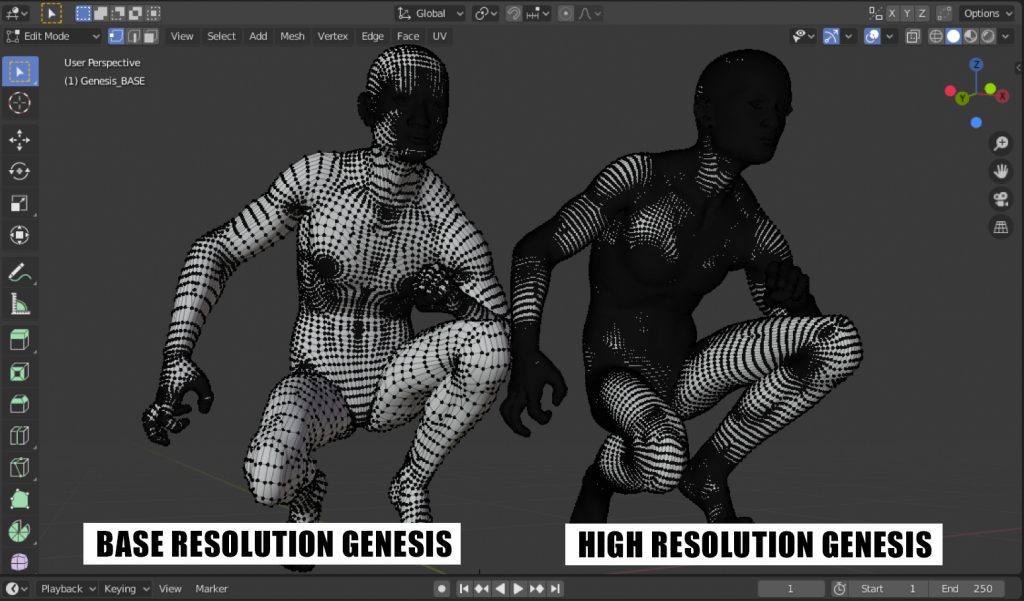
Base Resolution Genesis:
Verts: 19,296
Edges: 38,115
Faces: 18,872
High Resolution Genesis:
Verts: 76,283
Edges: 151,718
Faces: 75,488
We can see that the one using High Resolution is way more dense than the one using Base Resolution. If you have many figures in your scene that’s going to be a lot of unnecessary geometry.
So if possible, try to set everything you can to its Base Resolution.
3. EXPORT FROM DAZ VIA TELEBLENDER
Locate the Teleblender script you installed (the easiest way is to just search for it in the Content Library), or choose File > merge to locate it somewhere else on your drive and open it that way.
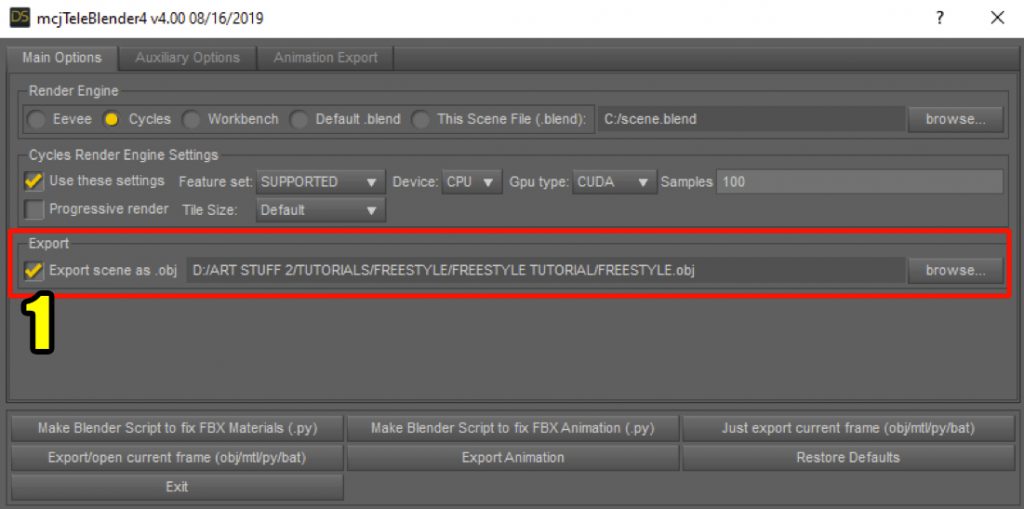
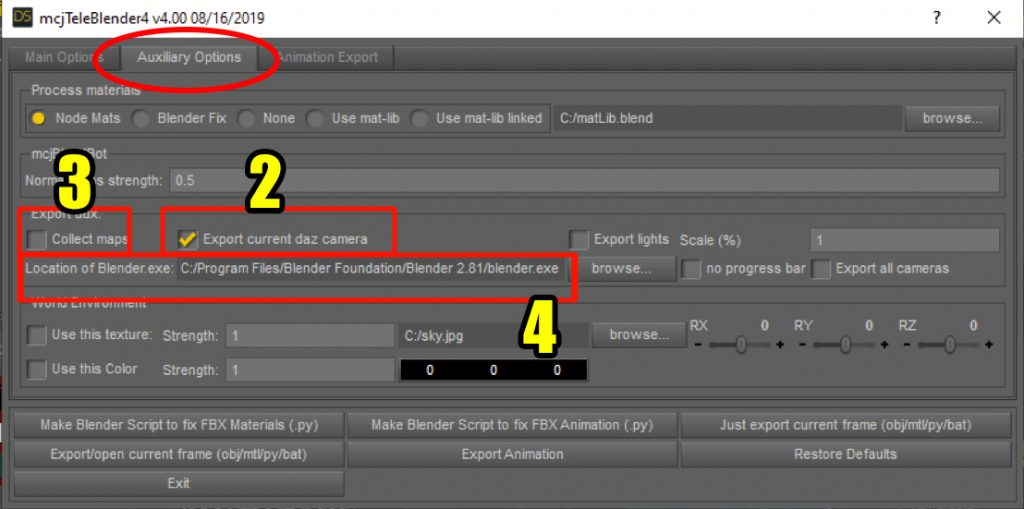
This will bring up the main Teleblender screen. You don’t have to know too much here, so don’t worry about all these options. Just ignore EVERYTHING except the following options for now:
- MAIN OPTIONS: Export name/location. We’ll click here and choose where to export the file to and where to name it. This doesn’t have to be named anything special or be saved anywhere special, it’s just so you know where to find it when you need to import.
- AUXILIARY OPTIONS: Export current Daz Camera. This one is super important, especially if you’re going to drop freestyle lines on a Daz render you made earlier.
- AUXILIARY OPTIONS: Collect maps. This one is really only important if you have opacity maps. Freestyle won’t draw any lines based on your opacity map, but at least Blender will use it and your render will come out with the same shapes as your Daz render. If you don’t have any opacity maps then don’t worry about this one and leave it off.
- AUXILIARY OPTIONS: Location of Blender. If you’re on Windows this helps you get your scene loaded up quicker in Blender. If you’re on the Mac this won’t really matter because you’ll have to import manually, but it’s no big deal as you will see.
You can forget about everything else in here, this is all we need for our purposes.
Once you’ve got these set, click the ‘Export/open current frame’ button. This working is contingent upon your Blender location being correct in the Auxiliary options. This ONLY works on Windows, though. On the ac you’ll have to import yourself, which is not really a problem, just a couple of minor steps.
If you’re on Windows, you’ll see Blender open, and your scene will be showing. Then you’re ready to go.
If you’re on the Mac this won’t work, though. Instead of the ‘Export/open current frame’ button, click the ‘Just export current frame’ button. This will export the python script to the place you defined earlier in the main Options. We’ll need to remember where this was so we can load it into Blender next.
4. IMPORT INTO BLENDER
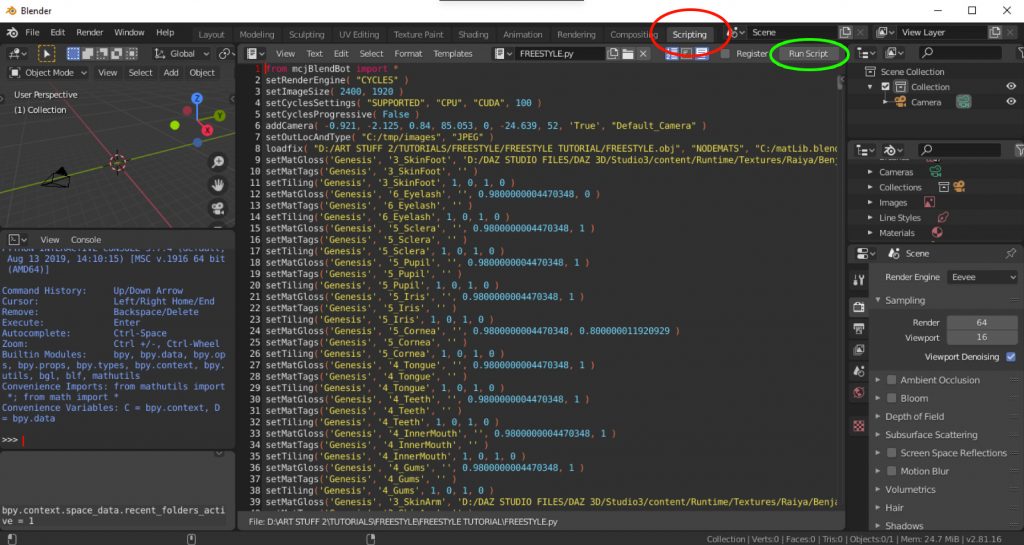
If you haven’t used Blender before, don’t worry about all this stuff in here. We’re going to take some specific steps and leave the rest alone.
So if you’re on Windows you would have just used the Export and Open button from the Teleblender script, and your scene will already be in here, so you can skip the next part.
For Mac users, or for some reason it just didn’t open it for you, you can just import it yourself.
First, go to scripting tab (circled in red in image).
We’ll click the Open button and load the python script (it should end in ‘.py’) Teleblender made for us in the location you chose.
Once it’s loaded we’ll see the contents of the script Teleblender spit out for us.
We’re not going to do ANYTHING with this code. All we’re going to do is run it.
Next, click Run Script Button (circled in green in image) to load up the python script – don’t worry about any errors. As long as it makes the scene and doesn’t distort or omit anything, it doesn’t matter what those errors say.
This might take some time depending on how much geometry is in your scene.
When it’s finished, click back to the Layout tab (first tab over on the left), and your full scene should be ready to go.
5. BASIC ORGANIZING AND CLEANUP IN BLENDER
So now that we have the scene you might need to do some basic clean up and housekeeping.
First, place your cursor over the main viewport window and press the 0 key on your Number Pad. This will set the view to your active camera.
Blender is a ‘context aware’ program, so this means that the same keystrokes can do different things depending on which window your cursor is in, or which mode (Edit/Object/Pose/Weight Paint) you are currently in. If you press your Numpad-0 and it does nothing, make sure your cursor is over the main viewport window. Pressing the Home key will fit the view (or all the objects in the scene) into the window.
In my video I do some basic cleanup work with my scene that will undoubtedly be different that what you have, so I’m going to truncate that section here, but it’s basically just me deleting unused faces and organizing my Collections (think Layers) in my Outliner view. If you want to see some of the things I decided to get rid of you can jump to that part of the video here:
Basic Cleanup in Blender – https://youtu.be/PgwXj1t5gfc?t=867
So the basic steps I did were:
- Delete any used faces by pressing Tab key to enter Edit mode, then selecting the faces using the Material Properties view on the right.
- In the Outliner (basically the scene tab from Daz – should be on the top right by default), move objects into their own Collections by selecting them, then pressing the ‘M’ key and choosing which collection they should move to in the resulting pop-up window (you’ll have the opportunity to create a new collection in the pop-up window).
- Get rid of extra cameras or lights that don’t need to be there. Select them and press the “X” key to delete.
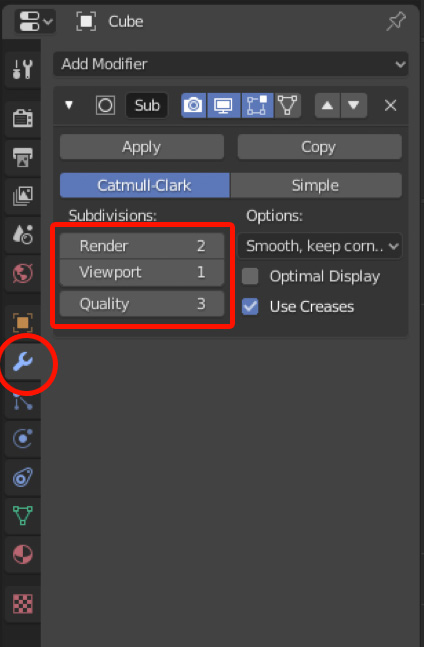
- Take care of poke-through you might see. If you set your character to Base Resolution, it might not be as smooth now and poke through the clothing. The easiest way to fix this is to assign a Subsurface Modifier (essentially the same thing as ‘Smoothing’ in Daz).
To do this select your character or object, then click the Modifiers View on the right (it’s icon looks like a wrench). Once here, click the ‘Add Modifier’ dropdown, and choose ‘Subdivision Subsurface’ from the ‘Generate’ column which is the second column from the left.
Once you apply that, it should be smoothed out enough to fix the pokethrough.
A word of warning: you can go too far with subsurf. Keep your Subdivisions as low as possible to get what you need. If you set them too high it can significantly affect your render times. Keep your viewport subdivisions at “1” unless absolutely necessary so it doesn’t slow down your ability to work in the viewport.
After taking care of these steps we should be ready to set up Freestyle!
6. ACTIVATE AND SET UP FREESTYLE
There’s a couple of things to be done to activate Freestyle.
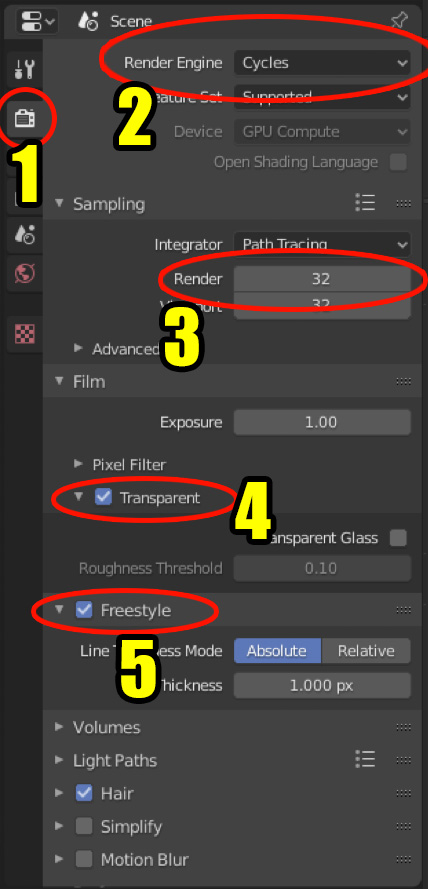
- Go to Render Properties View
- Check that we’re in the Cycles renderer. If not change the Render Engine to Cycles (Freestyle is a Post-render process, so we won’t use the actual render, but for our purposes here we need it to be on Cycles)
- In the Sampling section, change the Render samples to 32 (you can change this to 1 to get a quicker render, but your lines will be more jagged with less samples)
- Go to the Film section (probably much further down than in my screenshot), then check the ‘Transparent’ checkbox. This will make our background transparent so it’s easier to drop your lines on you render.
- At the bottom, check on the Freestyle button. There are only a couple of options here. Absolute means that no matter the size of your render, your line will be the pixel size entered here, no matter if it looks thin or thick. If you choose Relative, your line will look like it’s 1 point no matter what size your render is.
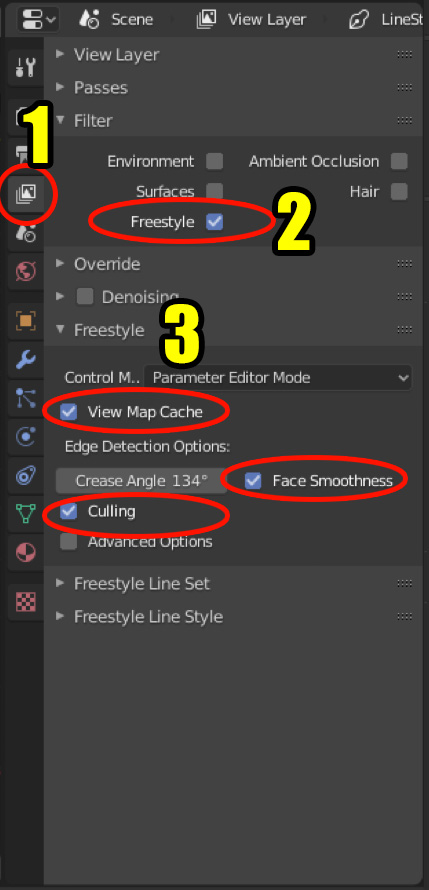
After this we need to go to our View Layer Properties:
- Click the View Layer Properties Icon
- View Layer Properties > Filter and turn off everything except Freestyle
- In the ‘Freestyle’ section there are three optional settings.
- View Map Cache – this stores a cache of your geometry to make Freestyle draw the lines quicker, but must be turned off when you change your geometry so it can update the changes.
- Face Smoothness – helps to make smoother lines. This works in conjunction with the ‘Shade Smooth’ setting you can choose in Edit mode by selecting Face > Shade Smooth from the Face menu. If your objects are not set to smooth then this will have no effect.
- Culling – this tells Freestyle to ignore edges that are out of view of the camera, saving some processing time.
- View Map Cache – this stores a cache of your geometry to make Freestyle draw the lines quicker, but must be turned off when you change your geometry so it can update the changes.
Now press the F12 key to render and see what you get! You should get some basic lines on top of a transparent background.
To save you can choose ‘Image > Save as…’ from the top menu to save the image, or press Shift-S (Windows) or Shift-OPT-S (Mac) and you’ll get a save dialogue box.
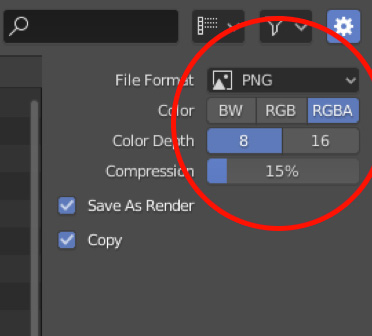
In here, if you want that transparent background make sure to save as a PNG file and make sure RGBA is selected so you get the Alpha transparency.
7. STYLING THE FREESTYLE LINES
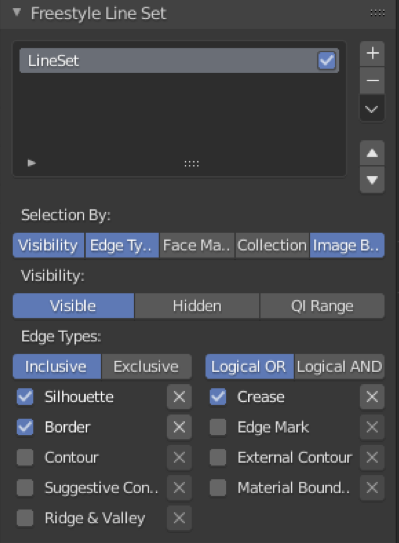
The Line Sets are where you pick the types of edges you want to draw on, and if Blender finds those types of edges it will draw a line there. You can read more about Edge Types here:
I’ll normally leave the default edge types of Silhouette, Border and Crease active when I do my first render. If I don’t need them or want them I’ll deactivate them, and if I’m not getting what I need I’ll try the others.
If necessary I’ll limit the lines by activating the Collection tab at the top of the Line Sets section, then choosing a Collection from the the selector that appears once activated.
Once I have my Line Sets chosen, I’ll move on to the Line Styles.
Just so you can see how I did what I did here’s a link to that part of the video where I really start styling up the lines:
Styling the lines in Freestyle – https://youtu.be/PgwXj1t5gfc?t=1895
But in this write-up I’ll just explain one of my favorite styles.
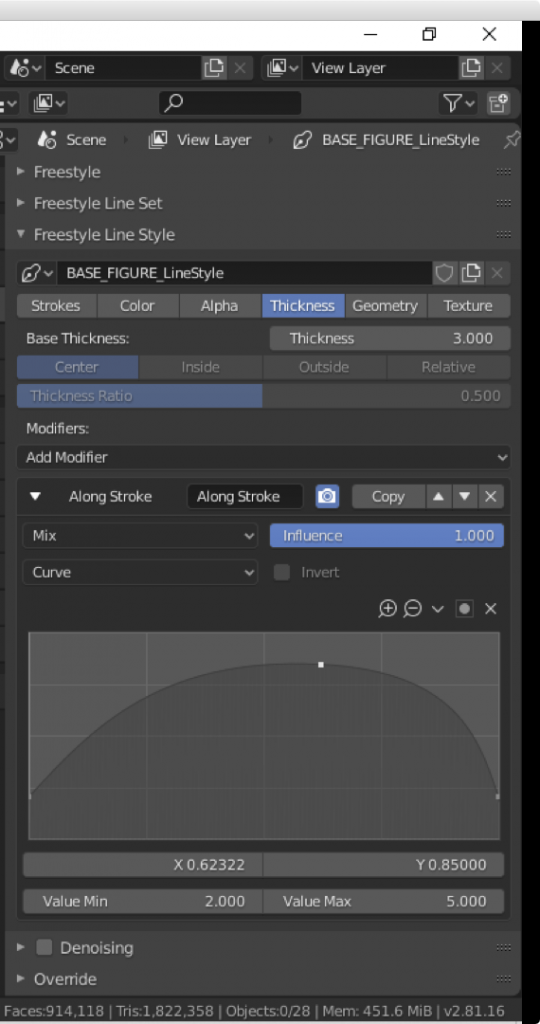
I like to vary the width of the line, and so I’ll open the ‘Thickness’ tab.
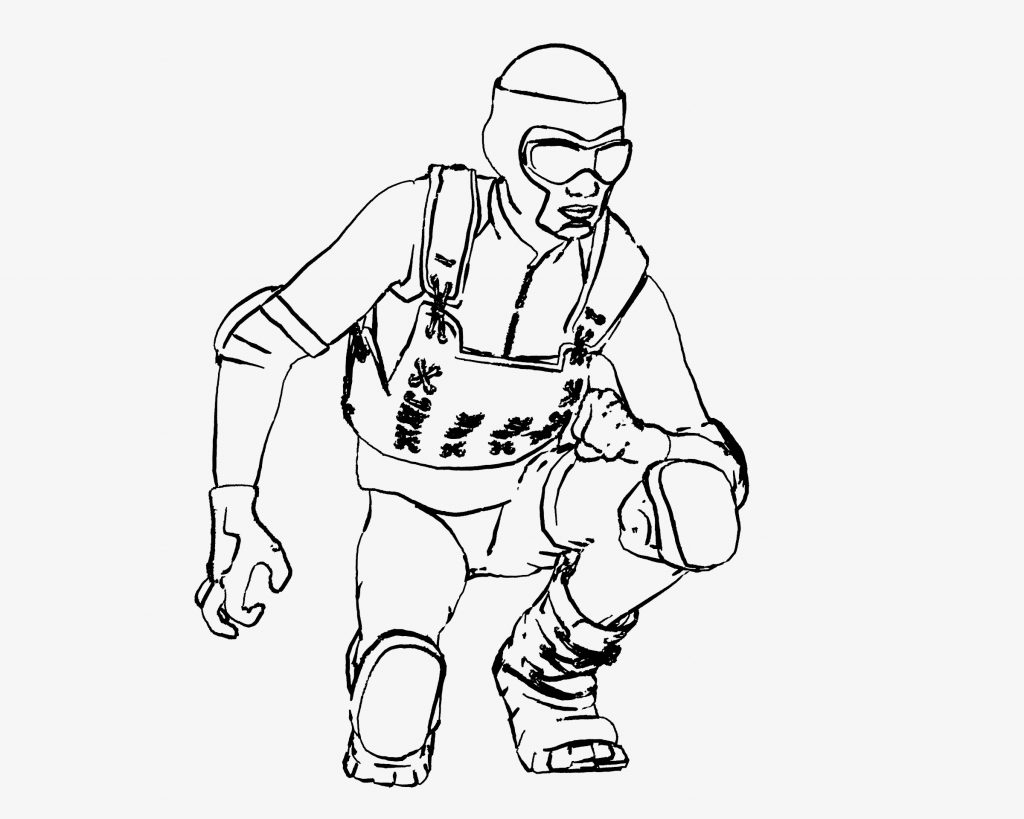
In here I’ll add an Along Stroke modifier, set it to curve and then set a minimum and maximum value for the line width.
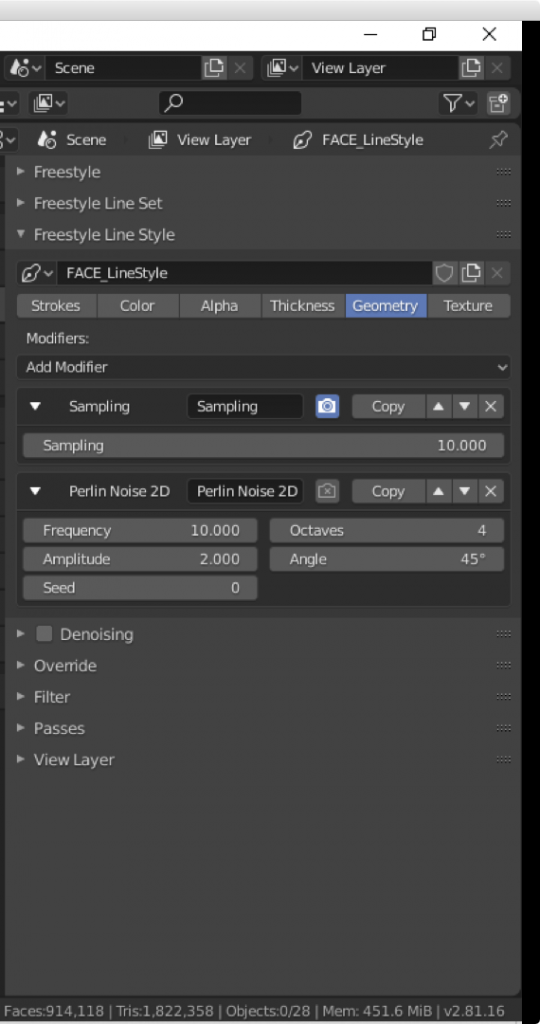
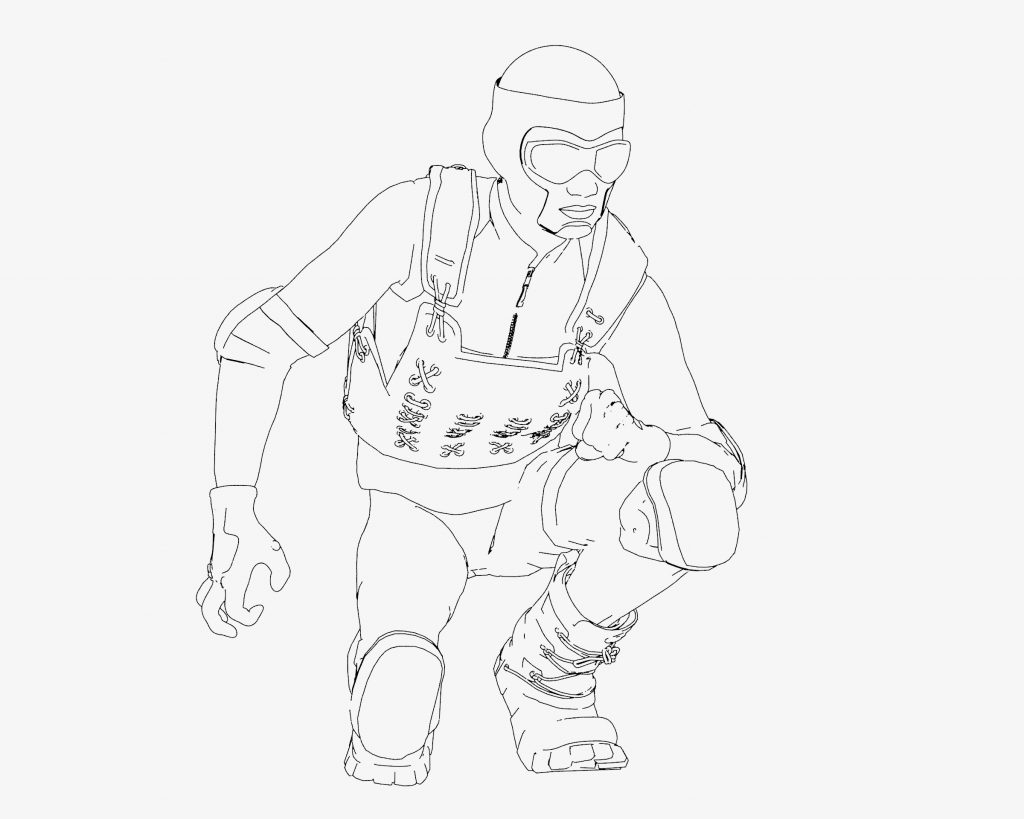
After this I usually go to the Geometry tab, then I add a Perlin Noise 2D modifer. This one adds disturbances to the lines so that they don’t look so perfect. I usually keep the frequency (how many times the disturbance happens along the line) where it is by default at 10, then I lower the amplitude (how strong the disturbance is) down to 2.
Doing this will transform my first image with default line settings:
Into a completely different look just by adding those two modifiers:
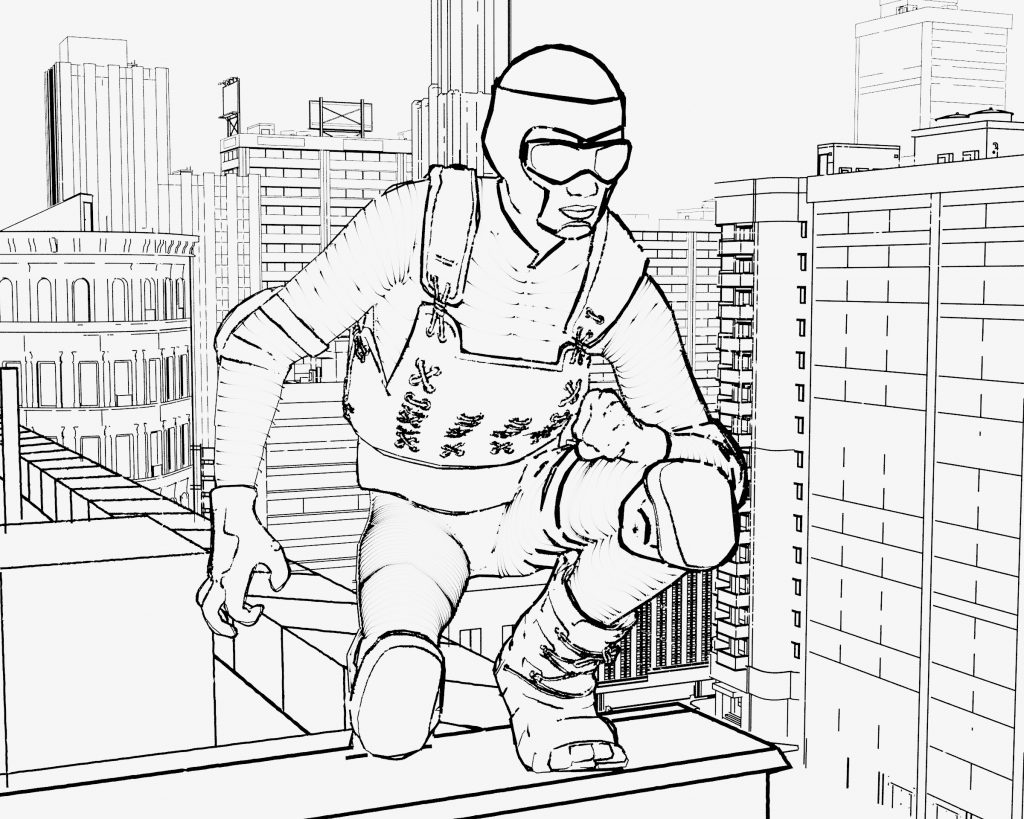
Lastly, here’s the final Freestyle image I came up with from the video itself, using a variety of Line Sets, Styles, Collections and other assorted tips and tricks.
8. WRAPPING UP
So there’s a wide variety of effects you can come up with jut by playing around, which I urge you to do. You’ll probably come up with something cool.
There’s even more to be done if you move into the scripting relam and start coding your own line styles.
For now though, if you’re just getting started and you want to really dive in, I would recommend the Freestyle Level Up course ($28.00 US):
I don’t make any money from this, it’s just how I got into Freestyle and learned what could be done.
The course is a bit old, and made for Blender 2.7, but the options have not changed that much that you won’t be able to follow it.
See my links at the top for other options on getting up to speed.
Aside from that have fun with it and let me know of any questions you might have.

